
 RSS Feed
How to Fix a Clogged Dryer Vent - Easy Step-by-Step GuideA clogged dryer vent not only hampers the efficiency of your clothes dryer but also poses a significant fire hazard. Over time, lint, debris, and even small clothing items can accumulate in the vent, restricting airflow and causing your dryer to work harder. Taking the time to clean and fix a clogged vent is a straightforward process that can significantly enhance your dryer's performance while safeguarding your home from potential fire risks. In this step-by-step guide, we'll teach you how to fix clogged dryer vents, ensuring optimal functionality and safety. Let's start with understanding why clogged dryer vents can be problematic. Why Is a Clogged Dryer Vent a Problem?Nobody wants to see their dryer become unusable when it's an essential part of the household, let alone be responsible for other issues around the property. So, why does clogging become a problem? A clogged dryer vent can lead to a range of problems, including:
As you can see, clogged dryer vents can cause more problems in the bigger picture than just hindering the function of the appliance. Fixing it is essential to a home maintenance routine, but you might wonder how to remedy it effectively. Step-by-Step Guide to Fixing a Clogged Dryer VentFixing a clogged dryer vent is easier. All you'll need is a few tools that should be standard around the household, and follow the twelve easy steps listed below. 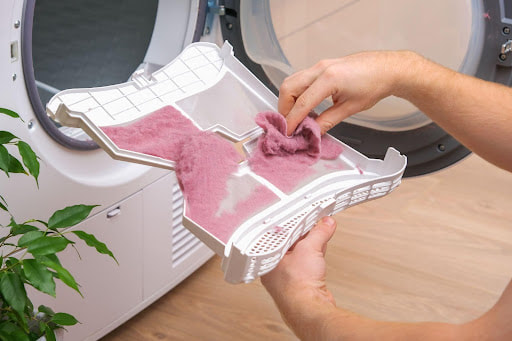 Before we begin, it’s highly advised to contact dryer repair specialists if your dryer vent problems seem like more than you can handle. Now, let's begin with the materials you'll need if you plan on fixing your dryer vent by yourself. If you don't have something, these are widely available from any home goods store.
1.Run All Your Safety Checks First, On The Appliance & Yourself Before you begin, ensure your dryer is unplugged from the power source. Safety gloves and a mask are recommended to protect your hands and respiratory system from debris. 2.Locate The Dryer Vent Locate the exterior dryer vent on the outside of your home. This is where hot air from your dryer is expelled. Also, locate where the duct connects to your dryer inside your home. 3.Remove The Exterior Vent Cover Use a screwdriver to carefully remove the screws holding the exterior vent cover in place. Once the screws are removed, gently pull the lid off. 4.Clean Out Any Debris From The Exterior Vent With the exterior vent cover removed, you'll likely see lint and debris accumulated around the vent opening. Use a vent brush or cleaning kit to remove the buildup carefully. Be thorough but gentle to avoid damaging the vent. 5.Disconnect the dryer vent Head inside your home and disconnect the dryer vent from the back of your dryer. This is usually held in place with a clamp or metal tape. 6.Move to cleaning out the vent pipe Using the vent brush or cleaning kit, insert the brush into the vent pipe and carefully clean the interior. Move the meeting back and forth to dislodge lint and debris. You may need to attach extensions to your brush to reach the entire length for longer vent pipes. 7.Vacuum the vent pipe After brushing, use a vacuum cleaner with a hose attachment to suck up the loosened lint and debris. This step ensures a thorough cleaning of the vent pipe. 8.Reconnect the dryer vent Once the vent pipe is cleaned, reconnect it to the back of your dryer and secure it using the clamp or metal tape. 9.Secure the exterior vent cover Return outside and place the exterior vent cover back over the vent opening. Use the screws to secure it in place. 10.Run a test on your dryer Plug your dryer back in and run a test load to ensure proper airflow and drying performance. Monitor the operation to make sure there are no unusual odors or issues. 11.Create a regular maintenance schedule to unclog your dryer To prevent future clogs, make a habit of cleaning your dryer's lint filter after each load of laundry. Additionally, schedule routine dryer vent cleanings at least once a year to ensure optimal performance and safety. 12.Consider professional inspection for optimal dryer function If you encounter stubborn clogs, are unsure about any step, or haven't cleaned your vent in a long time, it's advisable to seek professional help. Certified technicians have the tools and expertise to thoroughly clean and inspect your dryer vent system. And there we have it, that’s how you fix a clogged dryer vent! Your dryer should be back to functioning swimmingly, with a massively reduced risk of the appliance causing any further household problems. Final Words on Fixing Clogged Dryer Vents Fixing a clogged dryer vent is a simple yet crucial task that should be a part of your regular home maintenance routine. By ensuring proper airflow, you not only enhance your dryer's efficiency but also reduce the risk of fire hazards and extend the lifespan of your appliance.  A clean dryer vent saves you time and money and provides peace of mind, knowing that your home and family are safe from potential dangers. Get Professional Dryer Repair and Maintenance in Washington, DCSometimes, things can go wrong with your dryer, and it’s important for you to know how to fix a clogged dryer vent. But in case you can’t, our dryer repair contractors are ready to aid you with all dryer-related problems!
Whatever the case, here at MORE Appliance Repair, our experts provide the best appliance repair services and make it their priority to keep your essential household appliances running smoothly, including your dryer. Contact us for any appliance repair needs you may have around your house!
0 Comments
Leave a Reply. |
AuthorWrite something about yourself. No need to be fancy, just an overview. Archives
January 2024
Categories |